Character Modeling for Semi-Autonomous Animation
Building a Dude using WavesWorld
Traditionally, animation on computers has been similar to clay animation in that each motion in a character (or dude) needs to be specified throughout every scene. Some advantages exist in computing; namely you can allow the computer to interpolate (in a variety of ways, like linear and B-spline) between positions so that you needn't specify positions at every single frame. However, there haven't been very many good methods for re-using a series of motions in conjunction with others. Certainly you can re-run a motion sequence just like the first time you did it, but if some other factors also effect the character's motion, it is difficult to merge and reconcile any completing demands without doing a lot of re-writing.
WavesWorld provides a wonderful environment which icludes a mechanism for teaching characters to do things, like turn around towards an object. Furthermore, these abilities can be generalized so that a character can execute an instruction in a different way depending on its state and the state of its enclosing environment. Perhaps your character is tired, and will therefore turn more or less slowly. Or perhaps she is particularly giddy and turns quite suddenly and enthusiastically. And if she needs to be chewing on her bubble gum while turning, you merely tell her to do both. The exiting thing about WaveWorld is that you can build characters with various skills upon which you can draw at any time.
WavesWorld uses a modeling language called Eve, which is TCL with some extra features like a complete set of Renderman interface calls, some handy math functions, and the ability to specify that some commands should be re-evaluated at every sample, which others remain constant. In Eve, you can model any object using RenderMan primitives, or by including RIB objects modelled with other software. Then you can specify how objects and parts of objects interact with each other.
Additionally, WavesWorld provides a mechanism called a RIB Well by which you can instantly modify a dude's state and see the result, allowing you to preview the effect of certain Eve commands, and letting you test your character's functionality.
WavesWorld was written by Michael B. Johnson (Wave) as his Ph.D. thesis at the MIT Media Laboratory, under Professor David Zelter. For more information about using WavesWorld, consult his thesis document, WavesWorld: A Testbed for Semi-Autonomous Animation, available on-line as http://xenia.media.mit.edu/~wave/PhDThesis/outline.html, and from the MIT Libraries. (See also Wave's home page at http://xenia.media.mit.edu/~wave/.)
A character model in WavesWorld consists of shape, shading, and state. Shape and shading are what you seen on screen when you look at the character; state is a bit less visible, but determines the behavior and personality of a character, and is therefore quite perceptible in a scene. In this tutorial, we'll model a character - from concept sketches to final product - beginning with his shape (and, quite underemphasized, his shading), and ending with some state variables for emotion, so we can draw on these later. We'll consider the animatability of Tony's parts as we design them, and then having built a working model, we will write a script for a particular action our dude will perform and see the implementation of this new skill.
Shape
The first thing one needs is a character shape in the model. A character's shape is comprised of some geometric primitives - like spheres, cones, and patch meshes - and the transformations - like scale and rotate - which are applied to them.
Characters can be made up from a variety of geometric primitives, or from shapes created using any of a variety of modeling programs, such as Pixar's Showplace. Therefore, a character can be arbitrarily complex, with any number of parts.
Modeling Software
Modeling programs provide a powerful interface to allow one to create arbitrary shapes visually. This is very useful, since it is difficult to create complex shapes from primitives by hand in Eve code. However, when building a model, it is important to retain as much control as is necessary to make the characters do interesting things. This presents a problem to users of modeling programs. Modeling programs are good for creating static objects - everything in a given model is a single, rigid body. It is easy enough to apply linear transformations, such as shearing and scaling to a static model, but not much more. What we're usually looking for in animation is a character with articulated parts. Parts of the character should be able to move around with respect to the rest of the model. Rigid bodies don't allow parts to move independently, and are therefore difficult to work with.
This doesn't mean that using modeling programs is out of the question - in fact it is still very important if one wants to make a character model from complex shapes. The solution is to create each individual part separately using a modeler, make each into an Eve model, and then combine them together in a single Eve model.
State
An animated character has a state comprised of information like the position of its movable parts, which effects its geometry, and its emotional state, which effects what it may do next. The procedural agents which act on the model do so by manipulating the model's state. It is therefore important to consider what state variables one might need to represent the state of the character. When defining the character's parts and the transformations that act on them, one could factor in the these variables.
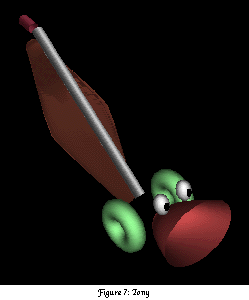
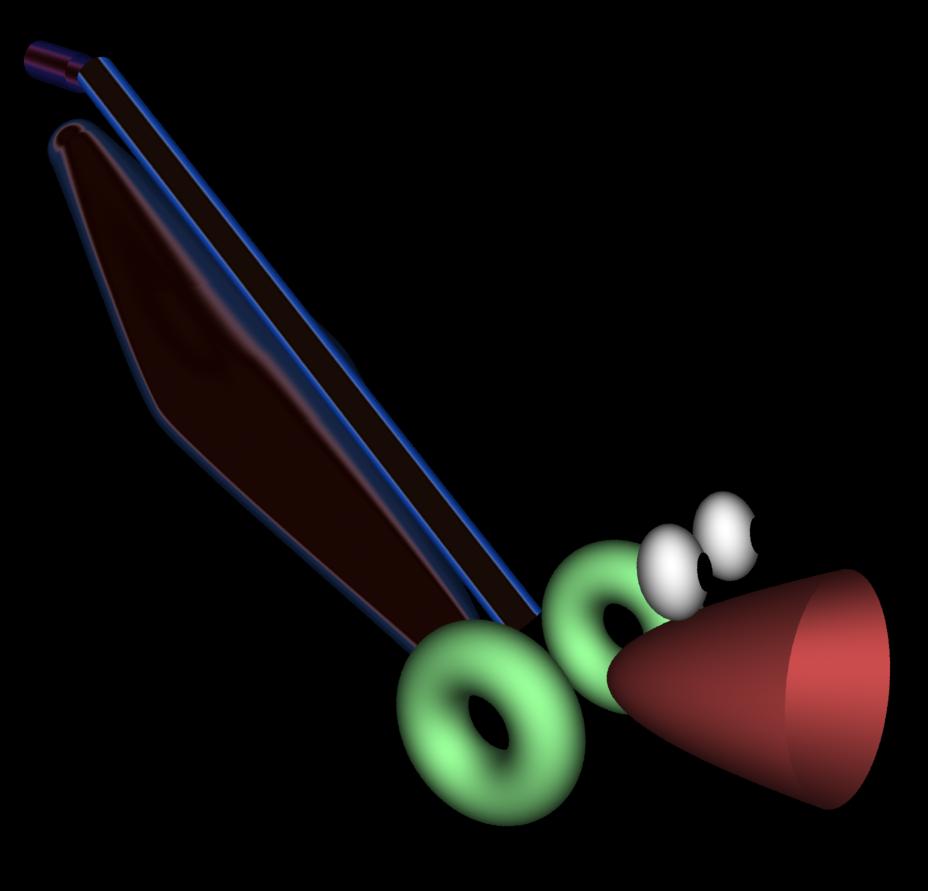
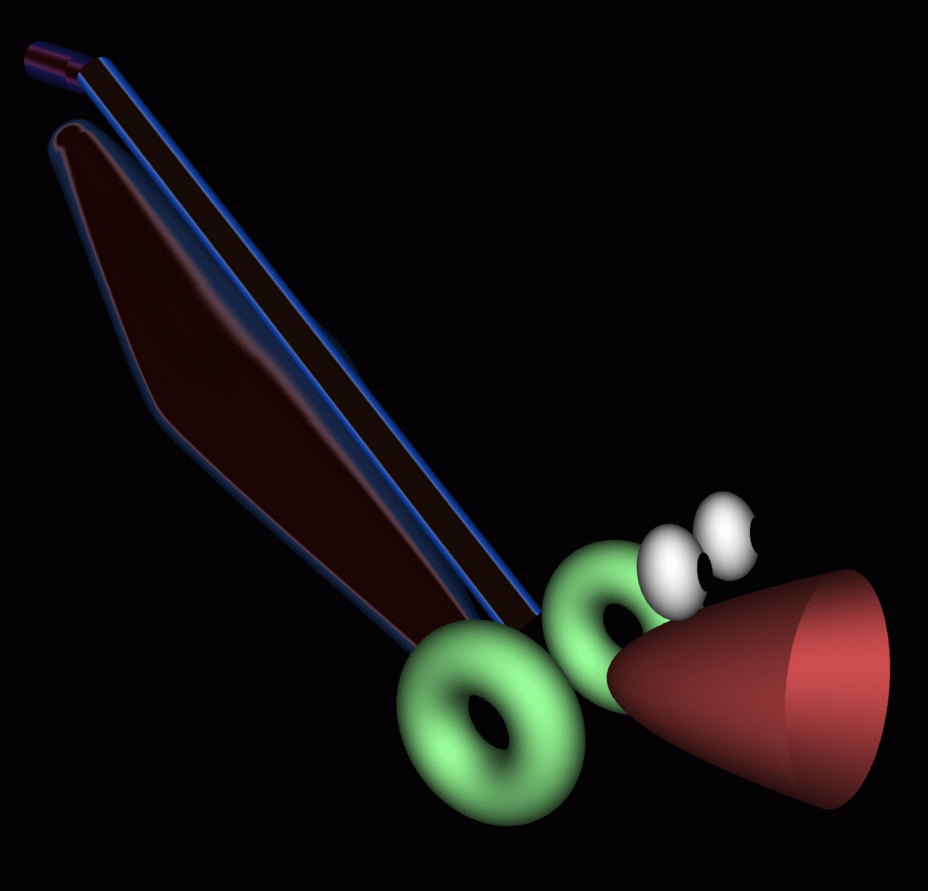
Meet Tony
I chose to model a character that could be modeled almost entirely with standard geometric primitives, so that rather than spending a lot of time using other modeling software, I could do most of the construction of my dude within WavesWorld using Eve commands. After some thought, I decided that household appliances have a certain appeal and settled on a vacuum cleaner, recently named Tony, as the basis for my dude. The vacuum cleaner I envisioned was geometrically simple, but had enough articulated parts to make for an interesting character. For example, Tony could run around finding garbage to consume when he was hungry. As Tony ate, his sack would fill up, and he would no longer be hungry.
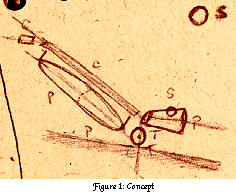
I jotted down the original concept drawing in my pocket notebook:
Parts List
I then proceeded to itemize each of Tony's articulated parts. Each part would be constructed from a Renderman geometric primitive, with the exception of the sack, which would be modeled using SolidThinking:
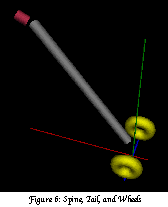
- the Head, a paraboloid
- the Spine, a cylinder
- the Wheels, each a torus
- the Tail (Handle), a cylinder
- the Eyes, each a sphere
- the Pupils, each a sphere
Connecting the Parts
It is very difficult, or at the least annoying, to control the character as a whole if all of the parts need to be manipulated individually every time you want to move the whole thing. Therefore it would be nice if parts could be grouped together in a coherent way. Rather than having each part positioned relative to the world, they can be positioned with respect to each other. In Tony's case, for example, the sack is always positioned just below the spine. Therefore, if the spine moves, it would be good if the sack moved with it. This suggests a hierarchy like this:
Tony
- Head
- Eyes
- Pupils
- Eyes
- Wheels
- Spine
- Sack
- Tail
The Origin
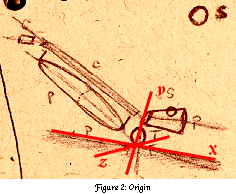
The above hierarchy works well because now, when the head moves, the eyes (and pupils) follow. Similarly, the tail moves with the spine. Note, however, that now when you move the tail, you move it with respect to the spine, not with respect to the whole character. Tony's body must have an origin point (we'll call it O(T)). All transformations applied to Tony are applied with respect to his origin. For example, if you rotate Tony, he will turn on an axis which goes through O(T). Tony's position is also defined by the position of his origin with respect to the world's origin. One can move Tony's origin by translating him body with respect to it, but for simplicity, we want to keep his origin in one place. We will construct Tony such that his origin lies right in between the bottoms of his two wheels (see figure 2). This makes moving Tony around on a plane (ie. the floor) simple.
However, now we need to consider how each part of our character will move. If, say, we want to be able to wag Tony's tail, we don't want to rotate it with respect to Tony's origin, as in that case it will move or of alignment with the spine. We therefore need the tail to have an origin of its own. As we model each part of Tony, we'll consider what motions we expect that part to be able to articulate. We'll then decide where it's origin should be.
Implementation
At this point, we can begin modeling our character in Eve. Our model.eve file looks
like this:
source $modelPath/defines.eve
source $modelPath/procs.eve

loadControlPanel controls.nib

startShape Tony
   drawVacMan
endShape

source $modelPath/animation.eve
The file defines.eve will
contain the initial definition of all of Tony's global variables,
including all of Tony's state variables, which may be read (sensed)
and/or manipulated by any skill and sensor agents we may later
write.
The file procs.eve
will contain the procedures use to draw Tony's body. We will be using
only one procedure for Tony, drawVacMan().
controls.nib is the Interface Builder
generated user interface for Tony which we will create to test out
Tony's abilities.
We define a shape Tony which is Tony's body. The
procedure drawVacMan will handle the details of drawing
Tony's body.
Finally, animation.eve will
contain the procedures used to define Tony's skills and sensors.
Articulated Parts
We will begin by defining Tony's various articulated parts. We'll
be concurrently adding to defines.eve and
procs.eve as we go. For each part, we'll go through the
primitive or pre-modeled object used as that part, and the
transformations and variables we'll use to control the part's position
and shape.
The Spine
The first item we will create is Tony's spine. Since vacuum cleaners tend to have spines which are straight tubes, a cylinder is pretty well suited for the task of being a spine.
We'll define a shape Spine within the shape
Tony. This means that any transformations applied to
Tony are applied to Spine. Furthermore,
Spine's origin is defined in relation to
Tony's origin. This is good, as it allows for the
hierarchy we want: If we move Tony, we move
Spine with him, yet we can move Spine around
independently, in relation to Tony.

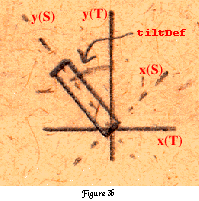
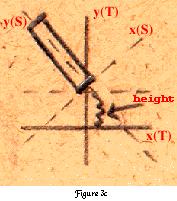
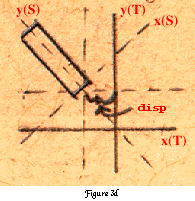
In relation to Tony want the bottom of Tony's spine to
be slightly above the XZ plane and slightly behind the YZ plane (see
Figures 3b and 3c). We also want to tilt it back some around the Z
axis, but we want to do this before we move the cylinder away from the
origin. The result is that the rotation happens at the bottom of the
spine (see Figure 3d), and therefore we will call that point the local
origin of Spine (O(S)).
We want to be able to manipulate the displacement of the spine from
O(T), the radius and length of the spine, and the spine color, so we
create some public variables which agents are encouraged to play with
(see listing below and Figure 3). The variable
spine(tilt) ranges from -1.0 to 1.0, and moves the tilt
angle of the spine from its default angle
(spine(tiltDef)) by a maximum of
spine(tiltVar) degrees in either direction. This provides
an easy way to stay within a range of tilt angles which make
sense.
## Spine
# Public
set spine(color)  {0.7 0.7 0.7}
set spine(length)  14.0
set spine(radius)  0.4
set spine(tilt)    0.0
set spine(disp)    0.6
set spine(height)  2.5
# Private
set spine(tiltDef) 35.0
set spine(tiltVar) 30.0
set spine(xR)      0.0
set spine(yR)      0.0
animatable: {set spine(zR) \
        [expr {$spine(tiltDef) + ($spine(tiltVar) * $spine(tilt))}]}
animatable: {set spine(xT) [expr {0.0 - $spine(disp)}]}
animatable: {set spine(yT) [expr {0.0 + $spine(height)}]}
set spine(zT)      0.0
startShape Spine
  animatable: {Translate $spine(xT)     $spine(yT)     $spine(zT)}
  animatable: {Rotate    $spine(xR) 1 0 0}
  animatable: {Rotate    $spine(yR) 0 1 0}
  animatable: {Rotate    $spine(zR) 0 0 1}
  # Z is up
  Rotate -90 1 0 0
  ##
  # Expansion Slot
  ##
  # The actual spine is a cylinder
  Color $spine(color)
  Surface DPMetallic
  animatable: {Cylinder $spine(radius) 0 $spine(length) 360}
endShape
Note that we left an "expansion slot" in the code above. We will be
defining other parts that will be positions with respect to the spine,
so we will instantiate their shapes within Spine.
The Tail
Tony's tail is defined relative to his spine. We therefore define a
shape Tail in shape Spine. Tony's tail is
another cylinder, which initially sits on top of the spine (see Figure
4a). The tail is then rotated and displaced from the top of the spine
(Figure 4b).
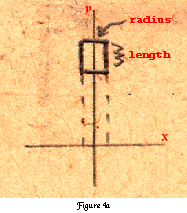
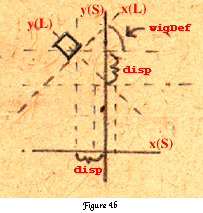
The tail is allowed to rotate along its Z axis
(spine(wag)) and along its Y axis
(spine(wig)). Like Spine's
spine(tilt), these values range from -1.0 to 1.0 and
allow for a set amount of rotation in either direction from the
defaults. The displacement along X(S) and Y(S) from the top of the
spine is defined by spine(disp).
## Tail
# Public
set tail(color)    {0.7 0.2 0.3}
set tail(radius)   $spine(radius)
set tail(length)   1.3
set tail(disp)     0.3
set tail(wig)      0.0	# -1.0 to 1.0
set tail(wag)      0.0	# -1.0 to 1.0
# Private
animatable: {set tail(xT) [expr {0.0 - $tail(disp)}]}
set tail(yT)       0.0
animatable: {set tail(zT) [expr $tail(disp)]}
set tail(wigDef)   0.0
set tail(wigVar)   80.0
set tail(wagDef)   -30.0
set tail(wagVar)   20.0
set tail(zR)       0.0
animatable: {set tail(yR) [expr {$tail(wagDef) + ($tail(wagVar) * \
	                         $tail(wag))}]}
animatable: {set tail(xR) [expr {$tail(wigDef) + ($tail(wigVar) * \
                                 $tail(wig))}]}
startShape Tail
  animatable: {Translate 0 0 $spine(length)}
  animatable: {Translate $tail(xT) $tail(yT) $tail(zT)}
  animatable: {Rotate    $tail(xR) 1 0 0}
  animatable: {Rotate    $tail(yR) 0 1 0}
  animatable: {Rotate    $tail(zR) 0 0 1}
  # The tail is a cylinder
  Color $tail(color)
  animatable: {Cylinder $tail(radius) 0 $tail(length) 360}
endShape
The Sack
The sack was originally intended to be a pair of paraboloids,
facing each other. However, I thought it might be more interesting to
use a less regular shape, and I wanted to include an example of
inserting a modeled object, so I instead used
SolidThinking to model the sack as a RIB object, which I
then dropped into a RIB Well to generate an Eve file. The sack merely
sits right under the spine, and so is also inserted as a shape within
Spine. The sack's malleable feature is that is fullness
(sack(full))may be set, as a value from 0.0 to 1.0, and
this will effect the size of the sack. The sack's fullness value also
represents how hungry Tony is.
## Sack
# Public
set sack(color)    {0.8 0.4 0.3}
set sack(full)     0.7
# Private
set sack(max)      5.0
set sack(width)    5.0
animatable: {set sack(sag) [expr {2.0 + ($sack(max) * \
                                         $sack(full))}]}
animatable: {set sack(disp) [expr {-0.1 - $spine(radius)}]}
startShape Sack
  animatable: {Translate $sack(disp) 0 0}
  animatable: {Scale $sack(sag) $sack(width) $spine(length)}
  Color $sack(color)
  source $modelPath/sack.eve
endShape
The Wheels
The wheels are simply tori. Since the wheels are Tony's only source
of locomotion, they are placed so that the midpoint between the lowest
point on each wheel is at Tony's origin, O(T). The wheels' only
adjustable geometry is the radius of the wheels. Each of the two
individual wheels is a separate nested shape within
Wheels, allowing us to address the wheels as a pair, or
each wheel individually.
## Wheels
# Public
set wheel(color) {0.6 1.0 0.6}
set wheel(radius) 2.0
# Private
set wheel(disp)   2.3
animatable: {set wheel(minorRad) [expr {$wheel(radius) * 0.35}]}
animatable: {set wheel(majorRad) [expr {$wheel(radius) - \
                                        $wheel(minorRad)}]}
startShape Wheels
  Color $wheel(color)
  animatable: {Translate 0 $wheel(radius) 0}
  ####
  startShape LeftWheel
    animatable: {Translate 0 0 $wheel(disp)}
    animatable: {Torus $wheel(majorRad) $wheel(minorRad) 0 360 360}
  endShape
  # LeftWheel
  ####
  startShape RightWheel
    animatable: {Translate 0 0 [expr {0 - $wheel(disp)}]}
    animatable: {Torus $wheel(majorRad) $wheel(minorRad) 0 360 360}
  endShape
  # RightWheel
endShape
Because we'd really like the height of the spine to be centered
slightly above the height of the wheels, we'll modify the
spine(height) so that instead of being a publicly
modifiable variable, it is a private variable which depends on
wheel(radius).
animatable: {set spine(height) [expr {$wheel(radius) * 1.5}]}
The Head
Tony's head is a paraboloid with its vertex on the Y axis, facing
down the (positive) X axis, and resting on the floor (XZ plane). It's
adjustable features are its height (head(height)), its
length (head(length)), and its scale factor in Z
(head(squish)) and Y (head(squash)). The
length, squish, and squash variables allow for an interested sucking
gesture when the vacuum is in action. The actual head is nested into
Head as shape Sucker so as to allow it to be
manipulated independently of the eyes, which are also nested into
Head. The eyes are borrowed from Wave's
singleEyeWithShinyThing model, and serve as as example of
re-using eve code from other characters. One can modify the look
direction and pupil size of the eyes.
## Head
# Public
set head(color)  {0.8 0.3 0.3}
set head(radius) 2.0
set head(length) 4.0
set head(squish) 0.0
set head(squash) 0.0
# Private
set head(xR)     0.0
set head(yR)     0.0
set head(zR)     0.0
animatable: {set head(ssquash) [expr {1.125 + \
                                     [expr {0.40 * $head(squash)}]}]}
animatable: {set head(ssquish) [expr {0.85  + \
                                     [expr {0.15 * $head(squish)}]}]}
animatable: {set head(height)  [expr {$head(radius) * \
                                           $head(ssquish)}]}
animatable: {set head(disp)    [expr {0.6 * $head(height)}]}

## Eyes
# Public
set eyes(color) {0 0 0}
set eyes(radius) 0.6
set eyes(pupil) 0.4
set eyes(yR) 0
set eyes(zR) 0
set eyes(disp_side) 1.0
# Private
set eyes(xR) 0
animatable: {set eyes(height) [expr {$head(radius) + 0.1}]}
animatable: {set eyes(disp_forw) [expr {$head(length) / 2.0}]}
startShape Head
  animatable: {Rotate    $head(xR) 1 0 0}
  animatable: {Rotate    $head(yR) 0 1 0}
  animatable: {Rotate    $head(zR) 0 0 1}
  Rotate 90 0 1 0
  animatable: {Translate 0 $head(height) $head(disp)}
  ####
  startShape Eyes
    ####
    startShape LeftEye
      animatable: {Translate [expr {0.0 - $eyes(disp_side)}] \
                        $eyes(height) $eyes(disp_forw)}
      source $modelPath/eye.eve
    endShape
    # LeftEye
    ####
    startShape RightEye
      animatable: {Translate $eyes(disp_side) $eyes(height) \
                             $eyes(disp_forw)}
      source $modelPath/eye.eve
    endShape
    # RightEye
  endShape
  # Eyes
  ####
  startShape Sucker
    animatable: {Scale $head(ssquash) $head(ssquish) 1.0}
    Color $head(color)
    animatable: {Paraboloid $head(radius) 0 \
                       [expr {$head(length) * 1.0}] 360}
  endShape
  # Sucker
endShape
Again, we want to change something we've already done. If the
height of the head changes, we want the wheels to grow to accommodate
the larger or smaller head. We make a simple edit to the code for
wheel(radius):
animatable: {set wheel(radius) $head(height)}
Emotional State
We'll create an emotion variable which we can use to effect our animation agents. Tony gets hungry when his sack isn't full, and when he's hungry, he's less happy.
## Emotional State
# Public
set state(happyfactor) 0.5
# Private
animatable: {set state(happy)  [expr {$state(happyfactor) * \
                                      $state(hungry)}]}
animatable: {set state(hungry) $sack(full)}
Shape Summary
We now have a working model of Tony's shape, consisting of:
- A Spine we can tilt back and forth
- A Tail we can wag up and down and wig side to side
- A Sack which can become empty or full
- Two Wheels
- A Head we can contort in interesting ways
- Two Eyes we can aim
See the listings defines.eve and procs.eve to see the
complete Eve code for our character model.
Test Interface
WavesWorld allows you to build up a user interface for your model
which behaves much like an agent. You can create buttons, sliders,
text fields, and thumbwheels which call Eve functions in your model's
environment. For example, you can create a slider which sets
head(squish) to a value ranging from -1.0 to 1.0. This
allows you to easily and dynamically modify the variables you have
created in your model to see if the resulting behavior is as expected.
You can also have a button which activates a skill agent, and you can
watch as the skill agent modifies your model over time.
Animation
Having a complete model of our vacuum cleaner dude, we can now
write a skill agent that acts on the model over time. We'll write a
function suckMotorProgram() which tells Tony to start up
the vacuum engine and suck in an object.
Before we start on our function, we need to decide on what will happen as Tony sucks up an object. The test user interface comes in quite handy here, so we can play with out model as we decide what motions make Tony look just right.
Over the course of executing, our motor program has a sense of time
via one variable, u, which ranges from 0.0 at the
beginning and 1.0 and the end. This makes our program scalable - the
duration of the scene to be set to any length, without having to
edit the motor program. Our script should include periods of time
as ranges of u in which activity occurs.
- Bring attention to object, react (u = 0.0 -> 0.2)
- Eyes to object
- Shock - head grows and shrinks quickly
- Wag tail, amount depends on how happy Tony is
- Shock - head grows and shrinks quickly
- Start sucking (u = 0.2 -> 0.4)
- Straighten tail
- Spine tilts back
- Head stretches forward
- Spine tilts back
- Suck (u = 0.4 -> 0.8)
- Object reaches mouth (u = 0.8)
- Swallow (u = 0.8 -> 0.9)
- Object reaches mouth (u = 0.8)
- Head scrunches back
- Spine returns to normal position
- Head Grows a bit
- Spine returns to normal position
- Object is eaten (u = 0.9 -> 1.0)
- Eyes forward / attention released
- Head shrinks a bit
- Head unscrunches, re-expands a bit
- Head to normal
- Head shrinks a bit
- Yum, yum
- Sack grows
- Tony becomes a bit happier.
See the listing animation.eve to see
the Eve code for procMotorProgram().
Summary
It is evident that had we not considered the capability to move each individual part of our dude, we would not have been able to articulate a sucking action very well. We could also have made life far more difficult on ourselves by not imposing a sensible hierarchy on the relative origin and position of each part. With some forethought, we were able to make a fairly simple and agile character, which we could teach to do something interesting.
The terrific feature of the agent we implemented is that it can be
used at any time, even concurrently with another. If we were to write
a rotate body skill agent, we could have our dude sucking
while rotating to follow the object he is preying on. Or we could have
Tony sneeze after sucking up a piece of dust by attaching a sneeze
skill to the end of suckMotorProgram. The potential is
limitless, and the extensibility is built right in.
Some extras:
- A nice, big picture of Tony
- A flick of Tony in action
Wilfredo Sánchez Vega | M.I.T. Department of Electrical Engineering and Computer Science | [email protected]
Copyright © 1995 Wilfredo Sánchez